
RotaPlanter
For the 2021 International Housewares Design Competition, I had the opportunity to design a product specifically for in or around the home. Deliverables for this project/competition included a “book” detailing the entire design process, from initial recognition of the problem area all the way up to the final design.
Pain Point Identification
In order to begin the project, I had to first identify a pain point to design for. On a weekend home from school, I was visiting my grandparents when my grandfather began talking about how he used to garden.
He talked about how badly he missed traditional gardening, since he’s used raised planters for years due to his inability to tend to a typical garden. I asked him what was wrong with the raised planters he’s used over the years, and to my surprise, there were far more issues with the raised planters he’d used than I expected.
The biggest issues, he stated, revolved around the height and weight of them. He mentioned how he had tried some other raised planters that were too short or two tall, both of which contributed to either back pain or difficulty reaching all parts of the planter/plants.
My Mother and I had custom built some raised planters for him recently to ensure they were at his preferred height, but those brought forth more issues to them being too heavy for an older individual to ever move, which is a common trait among raised planters on the market today.

Existing Market
To ensure the viability of a new raised planter, I conducted market research to see if any current designs met the needs of older farmers. The main criteria I looked for was height adjustability (to conform to farmers of all heights), lightweight (to be movable by any user), and easy assembly (so that even users lacking in physical ability or experience with tools can assemble the planter without help from another person).
I used a 2x2 matrix to “score” the top performers on the market. While some current designs did prove to be both lightweight and easy to assemble, none were height-adjustable, meaning a new design that met all three criteria successfully would fill a current need in the market.

Sketching/Ideation
Once I proved that there was an opportunity to meet an unmet need for elderly indivual in the gardening community by creating a raised planter that was height adjustable, light weight, and easy to assemble, I began ideating and sketching out different ways to potentially accomplish that goal.
The majority of the ideation phase centered around various ways I could make the planter height adjustable or different form factors to allow for maximum use with the user’s reachable area.

Top Concepts
The three ideas that resonated with me most were then weighed against each other in terms of their benefits and drawbacks.
The scissor-mechanism design could be adjusted while full, set to many different heights, and had wheels for easy movement. However, it would be very expensive and difficult to assemble due to its many pieces and need for tools.
The “transformable” design required minimal assembly, could be adjusted to two different heights, was lightweight, and would also be very affordable. The drawbacks of this design included its inability to be height-adjusted while full, and the planting space changing depending on the chosen height.
The “modular” design was also lightweight and easy to assemble, but required more user movement to adjust its height and would require the user to use some planters solely as height-adjustments rather than planters themselves to make them taller as a whole.

Chosen Design
I elected to move forward with the “transformable” design, as it met all of the neds of the problem area and had minimal drawbacks.
Height-Adjustable: Simply rotate or flip the planter around on different phases to swap between heights. The taller height option is ideal for a standing user, while the shorter option is designed for those in a wheelchair.
Lightweight: The planter is made entirely of plastic so it is incredibly light. This ensures that any user can not only move the planter as needed, but also rotate it around to its different orientations with ease.
Easy Assembly: The planter is only one piece, meaning there is no assembly required.

Iteration: Sketching
Once I had narrowed down the overall concept of the planter, I went back to the sketching phase to iterate on the form of the planter.
At this point, I knew the method of height adjustability would be to simply rotate the planter around on its different sides to produce a different height, but the physical form the planter could take was still to be decided.
While the majority of the planter remained similar while iterating, simply changing two faces of the planter proved to provide very different overall forms.
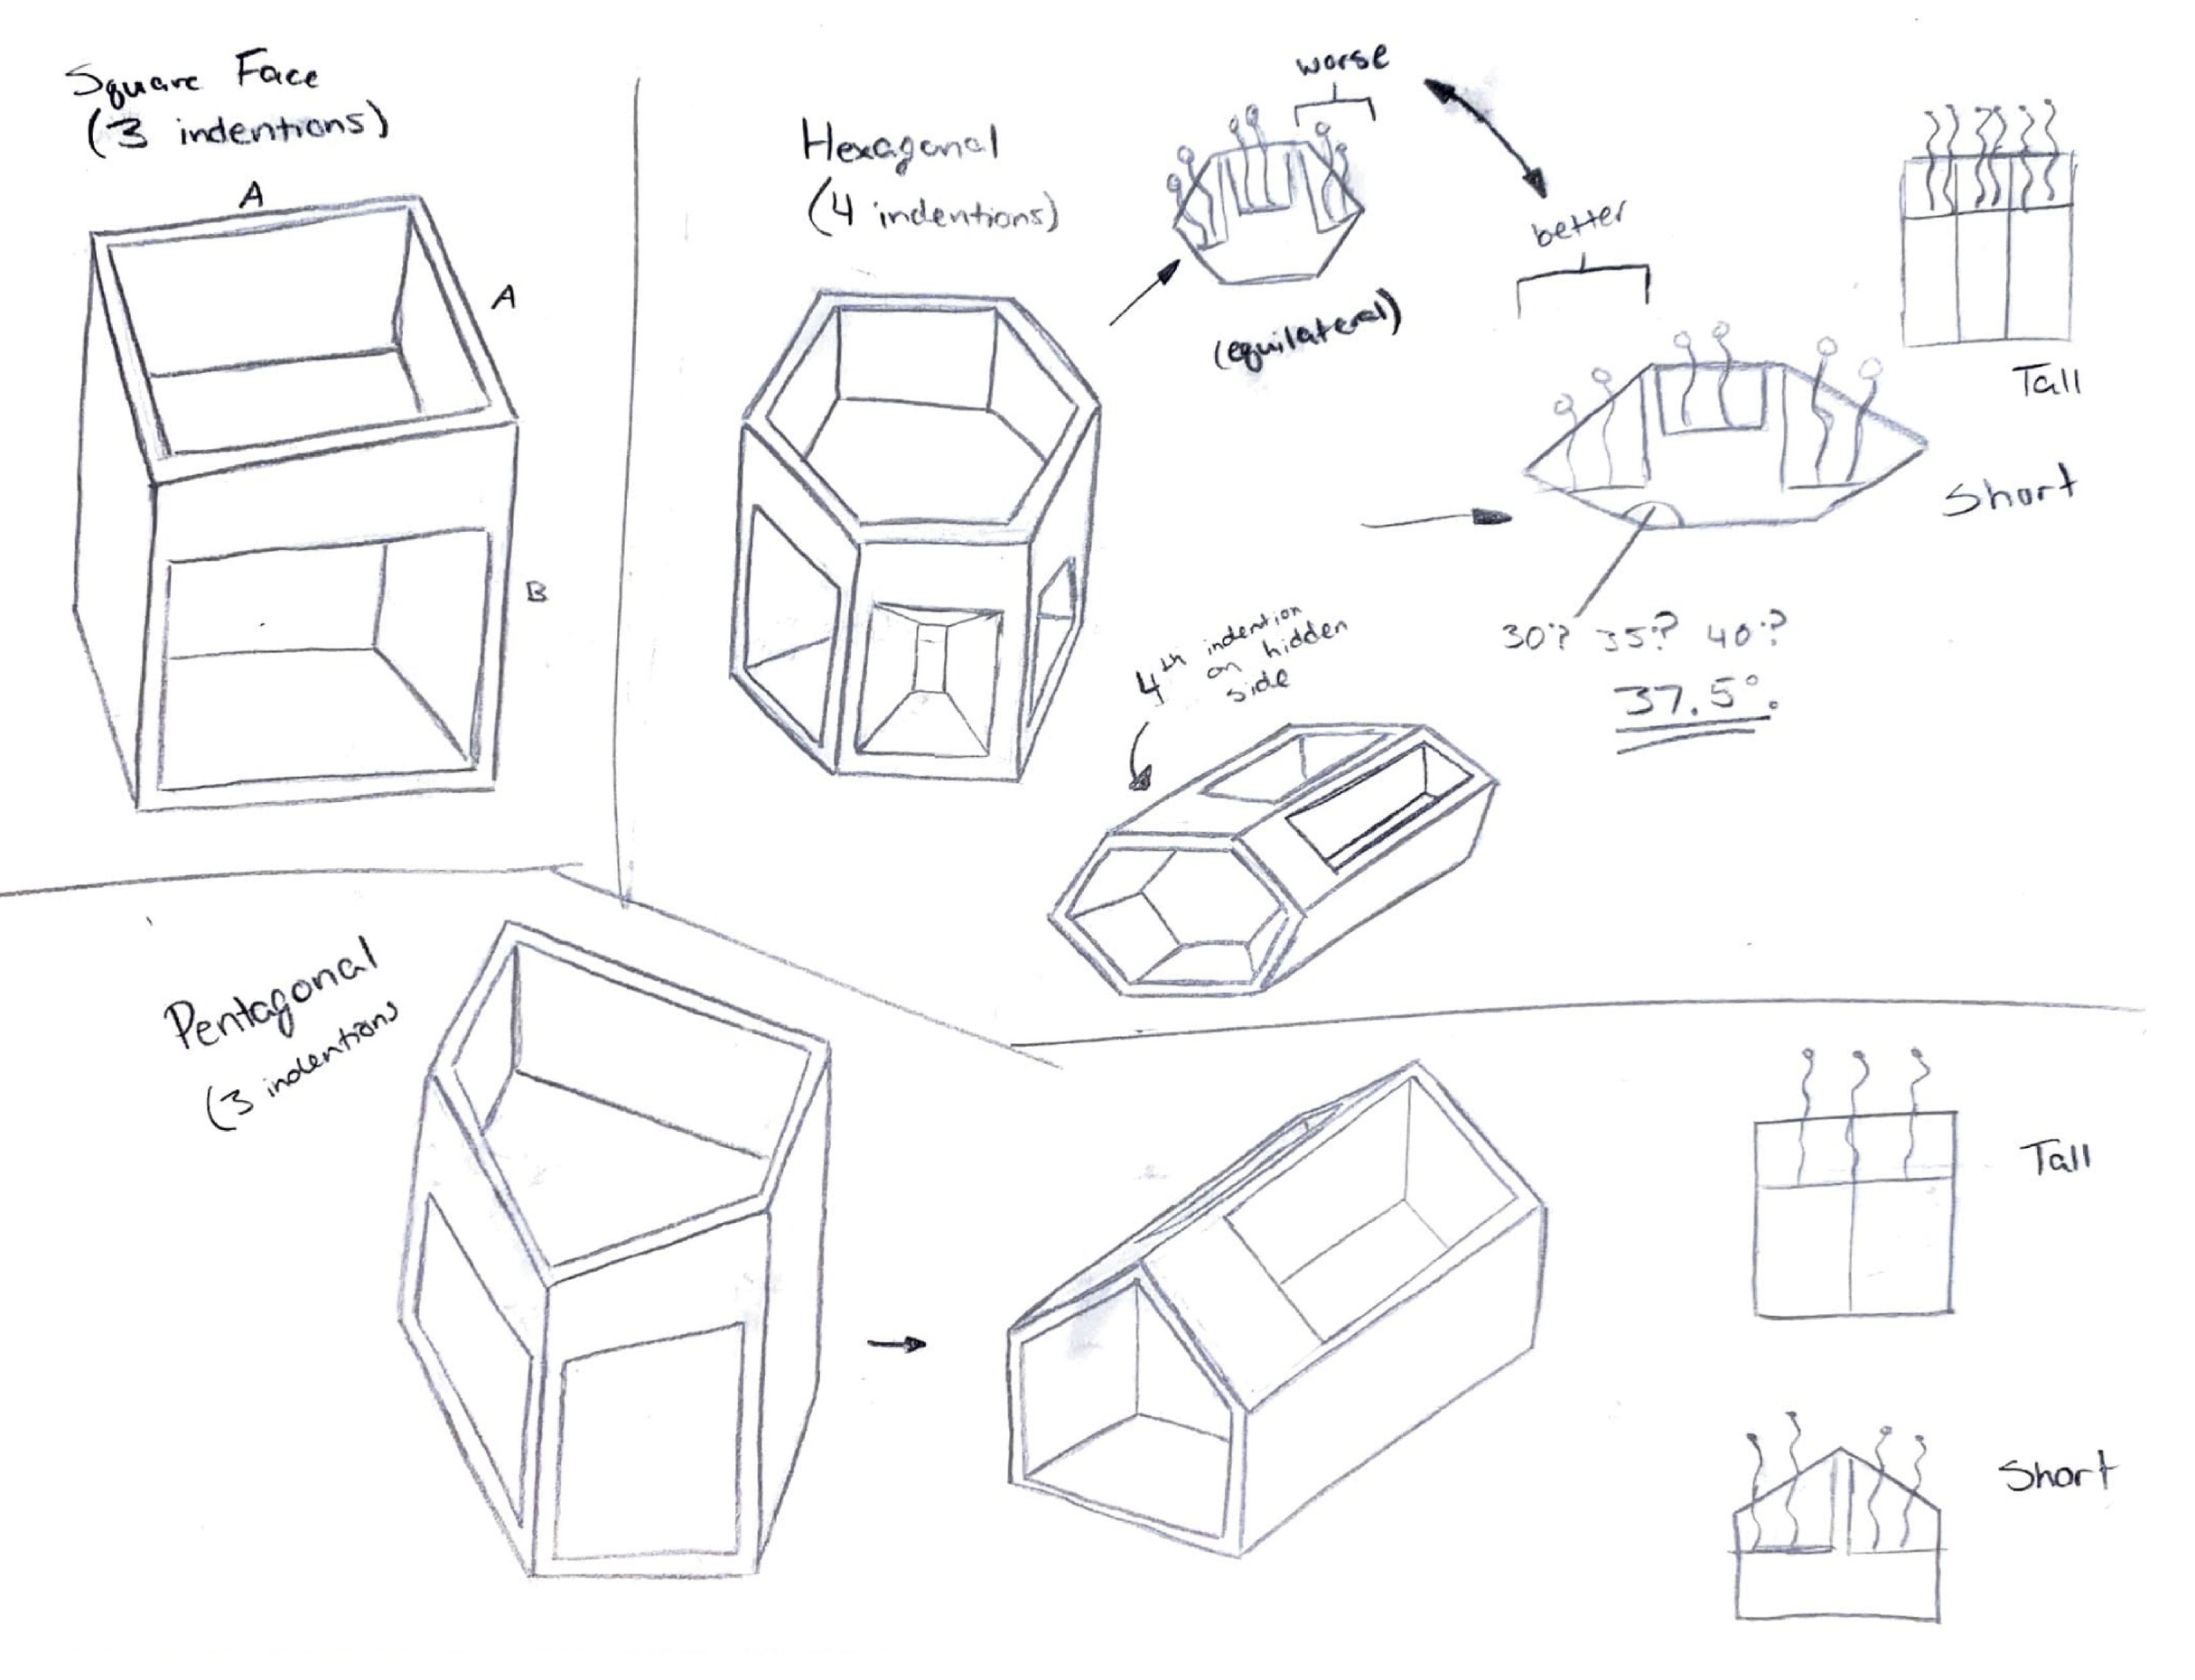
Iteration: CAD
By modeling higher fidelity versions of my sketches in Fusion, I was able to get a better feel for the similarities and differences among the different designs.
Introducing users into the scene helped to get a better grasp of each design’s human implications.
At this point, I was able to rule out the two hexagonal designs, as they both had balance issues and less planting area than the rectangular and pentagonal designs.

Further Research
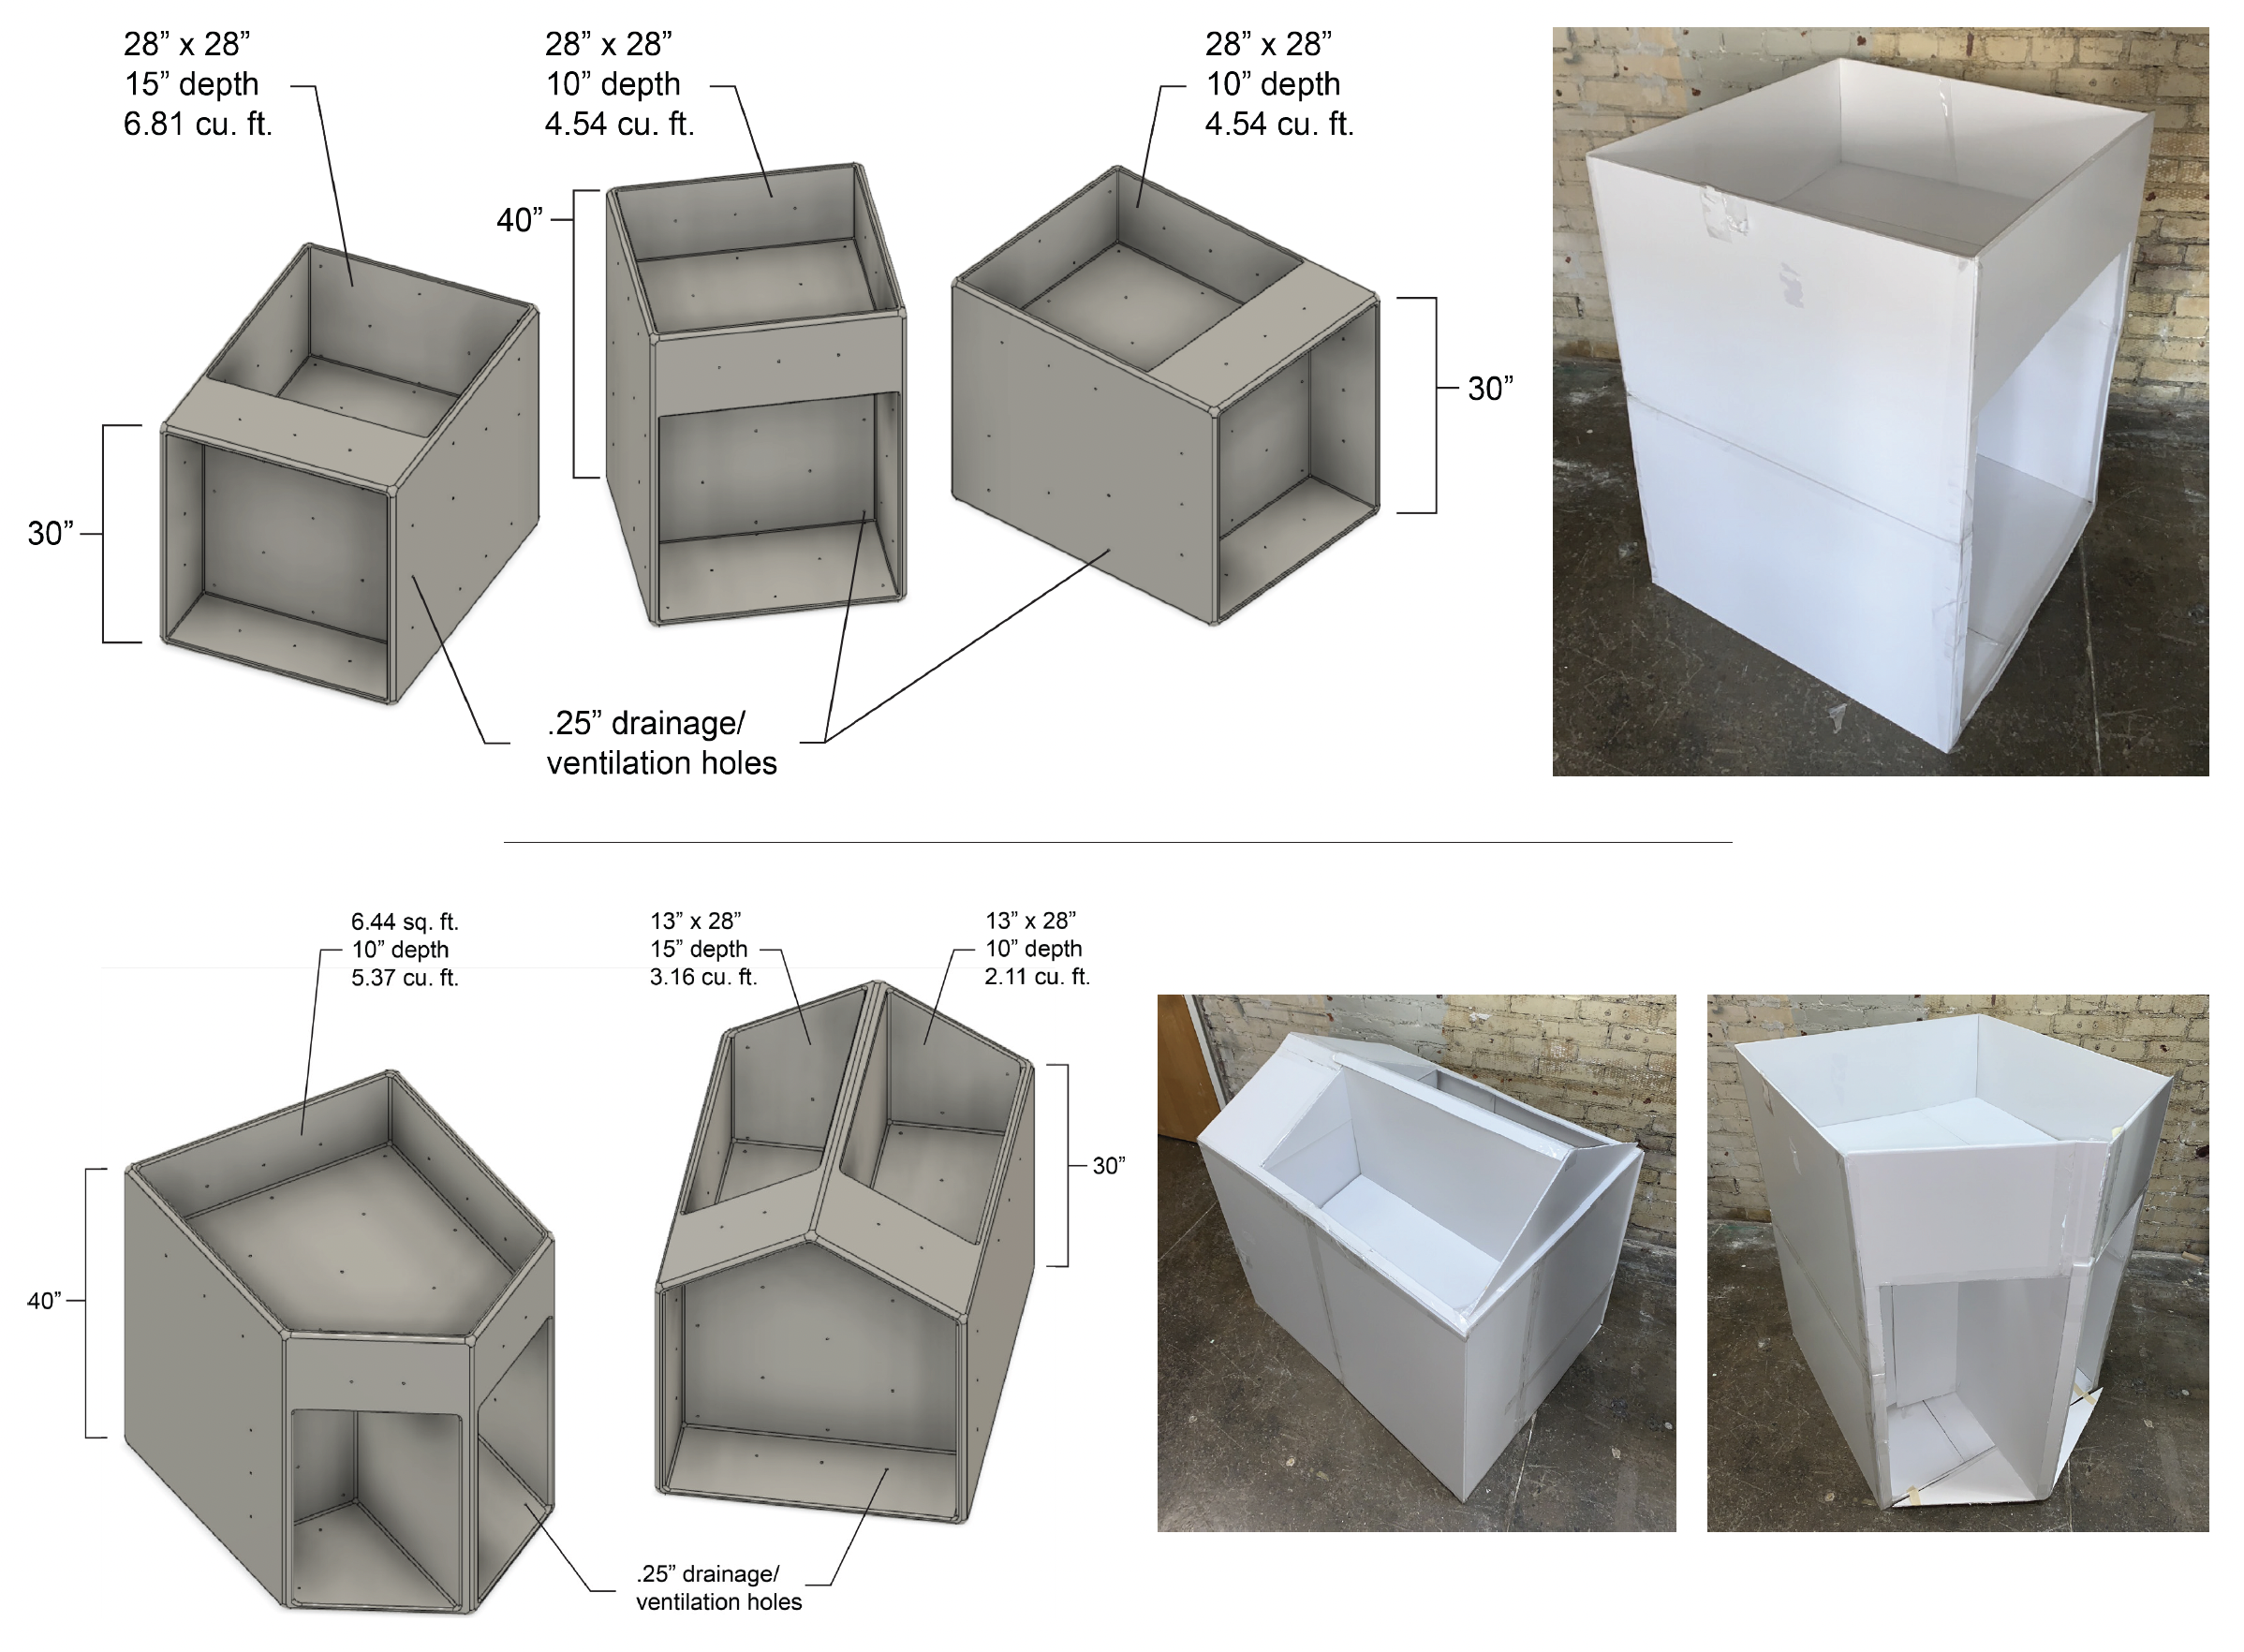
My next step was to get connected with those that use raised planters consistently in order to understand how more potential users felt about designs currently on the market. From this, I was able to get a much better understanding of what the ideal heights and widths of the planter really were. Many of the people I spoke with also mentioned an opportunity for storage space, which I took into account and will show back up later.
In addition to talking with various potential users for the product, I also took to additional resources to aid in determining the proportions of the planter. Through research revolving around ergonomic considerations for users as well as a look into the ideal planting area dimensions for various species of vegetation to prosper, I was able to decide on the final dimensions of the planter.
I also took this opportunity to begin varying the depth of each planting area, as different plants grow better from different depths. This further contributes to the user’s ability to use the planter in the most customized way.

Modeling
I then moved into physical prototyping so that I could get a better understanding of the actual size and shape of the designs. From this, I realized immediately that the planter was too big, regardless of which design I was going to move forward with.
While I aimed on keeping the planting surfaces at a comfortable level for users, I failed to consider that most of the interaction between a user and their planter occurs above the planting surface, so I needed to lower the “heights” of the planter (height is subjective depending on the orientation of the planter).
I also focused initially on maximizing the available planting area, but failed to consider the users’ reachable area. In order to ensure users would be able to reach all the necessary areas of the planter and its plants, I shortened the width of the form as a whole.
It was also at this point that I decided to move forward with the rectangular design, as it featured more planting area and a less complex form than the pentagonal design.
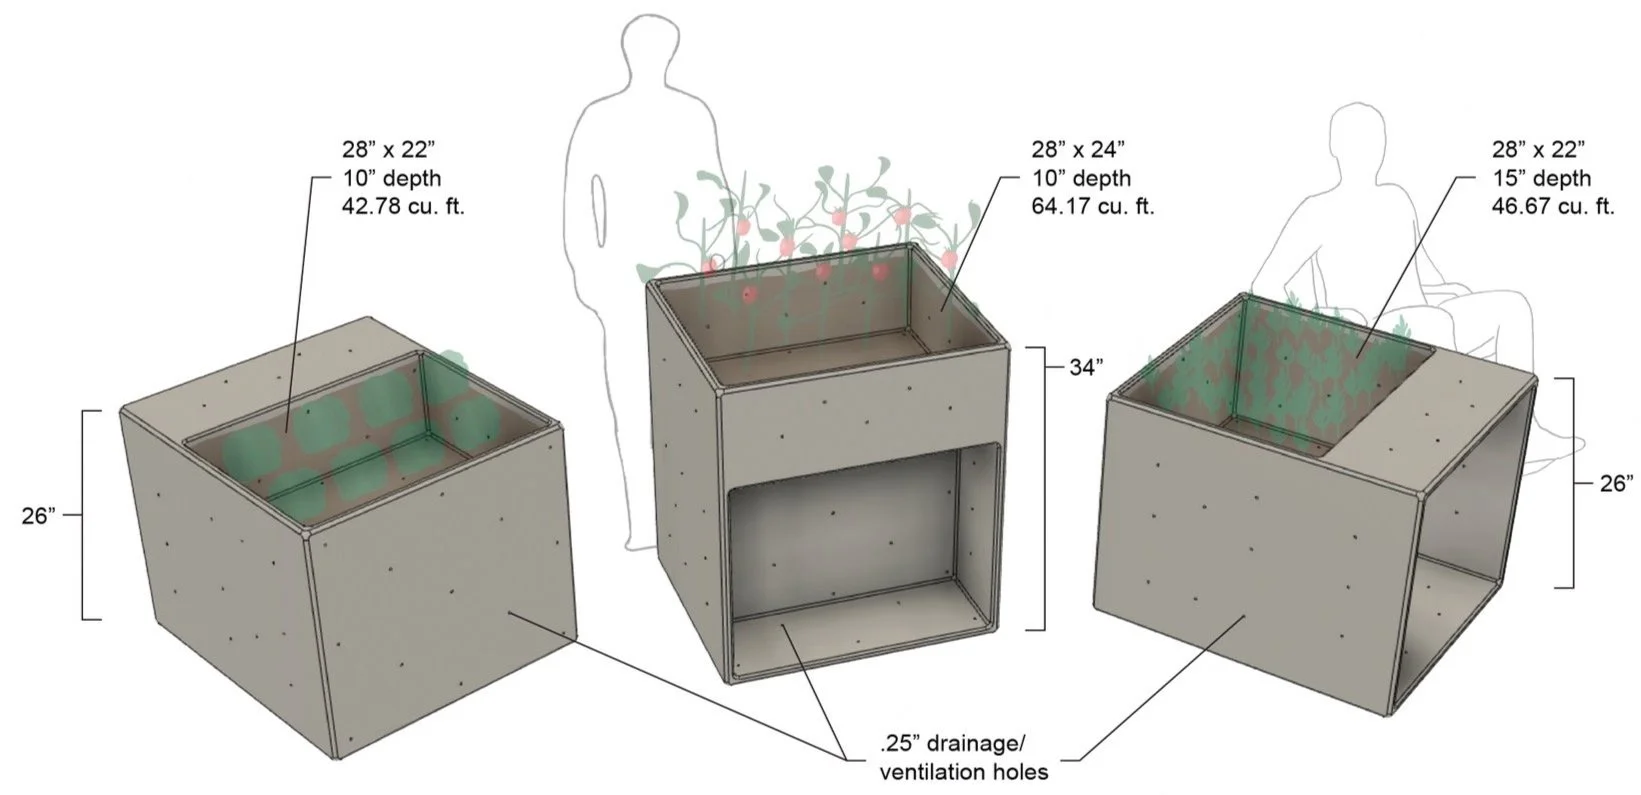
Updated Proportions

From everything I learned from my initial research, ideation, and prototyping, I made the final changes to the overall form of the planter. This final form was then created in Fusion and a new, updated physical model was then built.
Storage Feature
Once the design of the planter was (mostly) complete, I turned my attention to an opportunity previously mentioned by some of the potential users I talked to.
I began sketching out and iterating on some small storage attachments for the planter, in order to further benefit the users’ experience. The additional storage feature is a one-piece bin that hooks onto any edge of the planter and can house small tools, gloves, and more that the gardener might want to keep handy.

Final Design Decisions
Final changes to the planter were in regard to its storage and shipping process.
While it was necessary from the beginning that the planter be easy to assemble, it is also important that the product can be efficiently stored and shipped. By breaking the planter down into just a few pieces, the planter can be shipped and stored far more efficiently, while still being easy to assemble.
Additionally, this meant that each piece could be rotationally molded— the perfect manufacturing process for this product.

Assembly Process
The planter is easily assembled in just five steps, without the need for additional hands or even any tools.
1. Place the top of the planter upside down on the ground
2. Attach both side walls to the top face of the piece on the ground by inserting the “keys” into the keyholes, sliding the walls to the side, and then sliding the walls forward
3. Using the indention on the inner faces of the two side walls, slide the middle piece down until it meets the top face of the piece on the ground
4. Attach the base piece to the tops of the two walls by placing the keyholes over the keys, sliding the base piece to the left, then sliding the base piece forward
5. The planter is now fully assembled (upside down) and can be flipped and oriented in any of the three ways with a planting area facing upwards to begin planting

Shipping & Storage
The disassembled planter is just over a third of the size of the fully assembled planter. Four of the pieces fit within the two largest pieces, forming a 26” x 30” x 12” box. This is how the planter would be shipped and stored, rather than being one solid piece at 26” x 30” x 34”.


